Post 6: Sensitivity Labels and Why IRM Is Not Enough for Copilot
How to create, publish, and apply sensitivity labels. Why SharePoint IRM blocks you from doing it
Why this post matters
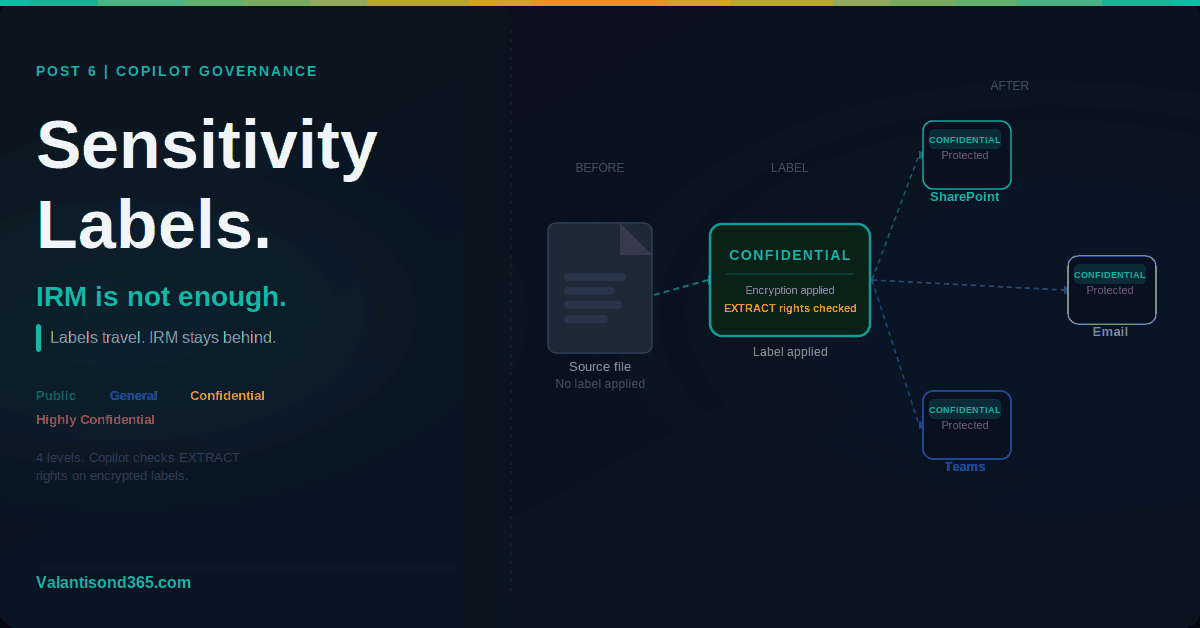
If your tenant still relies on SharePoint Information Rights Management (IRM) to protect document libraries, that protection is invisible to Copilot. IRM is not used for Copilot grounding. Copilot does not check IRM settings before surfacing content in responses.
Sensitivity labels from Microsoft Purview Information Protection are what Copilot recognises. When a label applies encryption, Copilot checks whether the user has the EXTRACT usage right before returning content from that item. Without a sensitivity label, there is no label-based access check. Only SharePoint permissions apply.
There is also a practical blocker: IRM and sensitivity labels are mutually exclusive on a SharePoint document library. If a library has IRM enabled, you cannot apply a sensitivity label to it. You have to disable IRM first.
This post covers how to create and publish sensitivity labels, how to apply them to sites and files, and what the IRM conflict means for your Copilot deployment.
Audience: SharePoint admins, compliance admins, and Microsoft 365 consultants preparing a tenant for Copilot.
TL;DR
- Copilot recognises sensitivity labels and respects their encryption. IRM is not used for Copilot grounding.
- IRM and sensitivity labels cannot coexist on the same SharePoint document library. Disable IRM before applying a sensitivity label.
- Admin path to create labels: Microsoft Purview portal > Solutions > Information Protection > Sensitivity labels.
- Labels must be published via a label policy before users can see or apply them.
- Protection from an encrypted label travels with the file when it is downloaded or moved out of SharePoint.
- Auto-labeling based on content requires Microsoft 365 E5 or the Purview compliance add-on.
IRM vs Sensitivity Labels: What the Difference Means for Copilot
| Aspect | Sensitivity Labels | SharePoint IRM |
| Copilot awareness | Copilot checks label encryption and usage rights before returning content. | Not used for Copilot grounding. Copilot does not check IRM settings. |
| Protection scope | Encrypts the file itself. Protection travels with the file wherever it goes. | Applied when files are downloaded. No protection when files are at rest in SharePoint. |
| Compatibility | Works with SharePoint, OneDrive, Teams, Exchange, and Office apps. | SharePoint document libraries only. Incompatible with sensitivity labels on the same library. |
| Admin path | Microsoft Purview portal > Solutions > Information Protection. | SharePoint admin centre > site settings > Information Rights Management. |
| Licensing | Manual labeling: Microsoft 365 E3 minimum. Auto-labeling: E5 or compliance add-on. | Included with SharePoint. No additional licence required. |
| Conflict | Cannot apply a sensitivity label to a library that has IRM enabled. | If IRM is enabled on a library, you cannot select a sensitivity label for it. |
| IRM conflict confirmed. Microsoft docs state: “SharePoint Information Rights Management (IRM) isn’t enabled for the library. This older technology isn’t compatible with using a sensitivity label for a SharePoint document library. If a library is enabled for IRM, you won’t be able to select a sensitivity label.” Source: Reference 4. |
Prerequisites
- Information Protection Admins, Compliance Administrator, or Sensitivity Label Administrator role group in Microsoft Purview.
- Manual labeling is available from Microsoft 365 E3. Auto-labeling based on content requires higher licensing. Check current Microsoft licensing guidance for your specific plan before committing to auto-labeling in a client tenant.
- Sensitivity labels must be enabled for SharePoint and OneDrive before they can be applied to files in those services. This is a one-time tenant-level setting.
- Any SharePoint document library you want to label must have IRM disabled first.
| Role requirements confirmed. Microsoft docs state the following role groups can create and manage sensitivity labels: Information Protection, Information Protection Admins, Information Protection Analysts, Information Protection Investigators, and Information Protection Readers. Alternatively, add the Sensitivity Label Administrator role to a custom role group. Source: Reference 2. |
Step 1: Create Sensitivity Labels
Admin path
Microsoft Purview portal > Solutions > Information Protection > Sensitivity labels > + Create a label
The three-step flow is: create the label, define what it does, publish it to users. You cannot skip the publish step. A label that is not in a published policy is not visible to users in any app.
Phase 1: Create the label
- Sign in to the Microsoft Purview portal at https://purview.microsoft.com.
- Go to Solutions > Information Protection > Sensitivity labels.
- Select + Create a label (classic scheme) or + Create then Label (modern scheme).
- On the Define the scope page, select the scopes this label applies to. For Copilot governance: select Files and other data assets for item-level protection. Select Groups and sites to apply the label to SharePoint sites and Microsoft 365 groups as a container label.
- Configure the protection settings for the label. For items: choose whether to apply encryption, content markings (watermarks, headers, footers), or classification only with no protection.
- Review the configuration and select Create.
| Scope matters. A label scoped to Groups and sites applies to the container (the SharePoint site or Microsoft 365 group) and controls settings like external sharing and privacy. It does not automatically apply to or encrypt the files inside that site. To protect files, you need a separate label scoped to Files and other data assets. Container labels and item labels are configured separately. Source: Reference 1. |
| Confirmed as: documented behaviour. Labels must have Files and other data assets selected in scope to be available for users to apply to documents and emails. Labels must have Groups and sites selected to be available as container labels for SharePoint sites, Teams, and Microsoft 365 groups. Source: Reference 3. |
Phase 2: Configure encryption (if required)
If you choose to apply encryption to a label, you have two options:
- Assign permissions now: you define which users or groups have which usage rights. This is the recommended approach for Copilot governance. Copilot checks the EXTRACT usage right (labelled as “Copy and extract content” in the portal) before returning content from an encrypted item to a user. If the user does not have EXTRACT, Copilot cannot surface that content.
- Let users assign permissions: users choose who can access the content when they apply the label. Less suitable for governance scenarios where consistent protection is required.
| Critical for Copilot. When a sensitivity label applies encryption, Copilot checks whether the user has the EXTRACT usage right before returning content from that item in a response. If the user does not have EXTRACT, Copilot cannot return the content. Only if the user is granted permissions to copy (the EXTRACT usage right) from an item, is data from that item returned by Copilot or agents. Source: Reference 5. |
Phase 3: Define label order
Labels are ordered by priority. A higher number means higher priority, typically a more restrictive label. In Copilot Chat responses that reference multiple items with different labels, Copilot displays the highest priority label from those items. Plan your label taxonomy so the most restrictive label has the highest priority number.
To change label order: select the label, select the three dots for Actions, then Move up or Move down.
Step 2: Publish Labels via a Label Policy
Admin path
Microsoft Purview portal > Solutions > Information Protection > Label policies > + Publish labels
A label that is not in a published policy is not visible to users. Publishing is a separate step from creating. One label can appear in multiple policies. This is useful when you want different labels available to different user groups.
- Go to Solutions > Information Protection > Label policies.
- Select + Publish labels.
- Select the labels to include in this policy.
- Choose the users or groups who should see and apply these labels. For a tenant-wide deployment, select All users and groups.
- Configure policy settings: set a default label if required, require users to provide justification when removing or downgrading a label, and enable mandatory labeling if your organisation requires all content to be labeled.
- Name the policy and select Publish.
| Confirmed as: documented behaviour. After publishing, labels become visible to the specified users in apps that support sensitivity labels. For new customers or tenants without existing labels, Microsoft may automatically create default labels and a default publishing policy. Changes to published labels replicate to Office apps on web within one hour of a browser refresh, and within four hours for desktop apps on Windows, macOS, iOS, and Android. Source: References 2 and 3. |
Step 3: Apply Labels to Sites and Files
Applying a container label to a SharePoint site
A container label applied to a SharePoint site controls the site-level settings: privacy (public or private for group-connected sites), external sharing, and access from unmanaged devices. It does not encrypt the files inside the site.
- Open the SharePoint site settings.
- Select Site information.
- Under Sensitivity, select the label from the dropdown.
- Save the settings.
Applying an item label to a file
Users apply item labels directly in Office apps using the Sensitivity button on the Home tab, or from the sensitivity bar in the window bar of supported apps. In SharePoint document libraries, users can also apply labels via the file properties panel.
| Protection travels with the file. When a sensitivity label applies encryption, the protection stays with the file wherever it goes, whether downloaded to a local drive, emailed as an attachment, or moved to another storage location. Unauthorised users cannot open the file regardless of where it is stored. Source: Reference 1. |
Disable IRM before applying a label to a library
If a SharePoint document library currently has IRM enabled, you must disable IRM on that library before you can apply a sensitivity label to it. IRM and sensitivity labels cannot coexist on the same library.
- Go to the SharePoint document library settings.
- Select Information Rights Management.
- Clear the Restrict permission to documents in this library on download checkbox.
- Select OK.
- Return to the library and apply the sensitivity label via the library settings.
| Confirmed as: documented incompatibility. Microsoft docs state IRM is not compatible with using a sensitivity label for a SharePoint document library. If a library is enabled for IRM, you will not be able to select a sensitivity label. Source: Reference 4. |
Step 4: Auto-Labeling (E5 or Compliance Add-On)
Auto-labeling applies sensitivity labels automatically to files and emails based on content, for example files containing credit card numbers, passport numbers, or custom sensitive information types. This does not require user action.
| Licence requirement. Auto-labeling based on content requires Microsoft 365 E5 or the Microsoft Purview compliance add-on. Manual labeling is available from E3. Source: Reference 2. |
Admin path
Microsoft Purview portal > Solutions > Information Protection > Auto-labeling policies > + Create auto-labeling policy
- Go to Solutions > Information Protection > Auto-labeling policies.
- Select + Create auto-labeling policy.
- Choose the sensitive information types or trainable classifiers that should trigger the label.
- Select the label to apply when a match is found.
- Choose the locations: SharePoint, OneDrive, Exchange, or all three.
- Run the policy in simulation mode first to see what would be labeled before turning it on.
- When satisfied with the simulation results, turn the policy on.
| Confirmed as: documented feature. Auto-labeling policies can be run in simulation mode before being activated. Simulation mode shows you which files and emails would be labeled without applying any labels. Source: Reference 3. |
Validate
Check 1: Labels visible to users
- Sign in as a regular user (not an admin) who is in scope of the published label policy.
- Open a Word document or Excel file in Microsoft 365 Apps.
- Confirm the Sensitivity button appears on the Home tab and the published labels are visible in the dropdown.
- If labels do not appear, allow up to four hours for desktop apps and one hour for web apps after publication.
| Expected result: All labels included in the policy published to this user are visible in the Sensitivity dropdown. The label that is set as the default label in the policy is already applied when the user opens a new document. |
Check 2: Encrypted label protection travels with the file
- Apply an encrypted sensitivity label to a test document.
- Download the file to a local drive.
- Sign in as a user who does not have access rights under that label.
- Attempt to open the downloaded file.
- Confirm access is denied.
| Expected result: The file cannot be opened by the unauthorised user regardless of where the file is stored. The label and its encryption travel with the file. |
Check 3: Copilot respects the label
- Apply an encrypted label to a file in SharePoint. Configure the label so that a specific user group has EXTRACT rights and another user group does not.
- Sign in as a user without EXTRACT rights.
- Open Microsoft 365 Copilot Chat and ask a question that would normally return content from that file.
- Confirm Copilot does not return content from the encrypted file.
- Sign in as a user with EXTRACT rights and repeat.
- Confirm Copilot returns content from the file for the authorised user.
| Expected result: Copilot returns content from the encrypted file only for users who have the EXTRACT usage right under the label’s encryption configuration. |
Troubleshooting
| Symptom | Most likely cause | Fix |
| Labels not visible in Office apps for a user. | The user is not in scope of a published label policy, or the policy has not yet replicated. | Check the label policy scope in the Purview portal. Confirm the user or their group is included. Allow up to four hours for desktop apps and one hour for web apps after any policy change. |
| Cannot select a sensitivity label for a SharePoint document library. | The library has IRM enabled. IRM and sensitivity labels cannot coexist on the same library. | Go to the library settings > Information Rights Management and disable IRM. Then return to the library and apply the sensitivity label. Source: Reference 4. |
| User cannot open a labeled and encrypted file. | The user is not included in the label’s encryption permissions. Encryption checks usage rights, not SharePoint permissions. | Review the label’s encryption configuration in the Purview portal. Check which users or groups are assigned which usage rights. Add the user or their group to the permissions. Source: Reference 1. |
| Copilot is not returning content from a labeled file for an authorised user. | The label applies encryption but the user does not have the EXTRACT usage right assigned. | Check the label’s encryption permissions. Confirm the user or their group has Copy and extract content (EXTRACT) assigned. Without EXTRACT, Copilot cannot return content from that item. Source: Reference 5. |
Lessons Learned
These come from working with sensitivity labels across client tenants.
- Check for IRM-enabled libraries before you start labeling. Run a SharePoint site audit or use PowerShell to identify libraries with IRM enabled before you try to apply sensitivity labels. Finding out mid-deployment that a library is blocked is avoidable.
- Container labels and item labels are different things. A client who applies a Confidential label to a SharePoint site expects the files inside to be protected. They are not. Container labels control site settings. Item labels control file protection. Both need to be configured separately and both need to be communicated clearly to the client.
- The EXTRACT usage right is the one that matters most for Copilot. When configuring encryption on a label, the permission level Co-Author includes EXTRACT. Reviewer does not. If you want Copilot to be able to return content from an encrypted file to a user, that user must have a permission level that includes EXTRACT. Plan your permission levels with this in mind.
- Test with a non-admin account. Labels and encryption behave differently for admins versus regular users. Always validate the user experience with an account that has no elevated permissions before rolling out to the organisation.
- Mandatory labeling generates support tickets. If you turn on mandatory labeling in the policy (requiring all documents to have a label), users who work with legacy files or template documents will hit prompts they do not understand. Phase this in carefully and communicate to users before enabling it.
- Simulation mode for auto-labeling is not optional. Run every auto-labeling policy in simulation mode before activating it. The results will show files you did not expect to be in scope. This is especially true if you are matching on broad sensitive information types like financial data.
References
All links verified April 2026.
1. Learn about sensitivity labels – Full overview of what sensitivity labels are, what they can do, how they work with Copilot, and how encryption and usage rights interact.
https://learn.microsoft.com/en-us/purview/sensitivity-labels
2. Get started with sensitivity labels – Covers licensing requirements for manual and auto-labeling, role permissions required to create and manage labels, and the basic deployment flow.
https://learn.microsoft.com/en-us/purview/get-started-with-sensitivity-labels
3. Create and configure sensitivity labels and their policies – Step-by-step documentation for creating labels, configuring scope, and publishing via label policies. Covers both classic and modern label schemes.
https://learn.microsoft.com/en-us/purview/create-sensitivity-labels
4. Configure SharePoint with a sensitivity label to extend permissions to downloaded documents – Documents the incompatibility between SharePoint IRM and sensitivity labels. Confirms that IRM must be disabled on a library before a sensitivity label can be applied.
https://learn.microsoft.com/en-us/purview/sensitivity-labels-sharepoint-extend-permissions
5. Considerations for Microsoft Purview to manage Microsoft 365 Copilot – Confirms that Copilot checks the EXTRACT usage right before returning content from encrypted items. Explains how IRM library settings interact with Copilot.
https://learn.microsoft.com/en-us/purview/ai-m365-copilot-considerations
6. Microsoft Purview data security and compliance protections for Microsoft 365 Copilot – Overview of how Purview capabilities including sensitivity labels, DLP, and audit protect data when Copilot is used.
https://learn.microsoft.com/en-us/purview/ai-microsoft-purview
Conclusion
IRM protects downloads. Sensitivity labels protect the content itself, wherever it goes, and that is what Copilot understands and respects.
The practical impact for a Copilot deployment is direct. If your sensitive files are only protected by IRM or by SharePoint permissions, Copilot may surface them to anyone with access. If they are protected by an encrypted sensitivity label with the correct usage rights, Copilot checks those rights before returning anything.
The IRM conflict is a real blocker in tenants that have been running SharePoint for years. Check your libraries, disable IRM where you need to apply labels, and build your label taxonomy with Copilot usage rights in mind from the start.