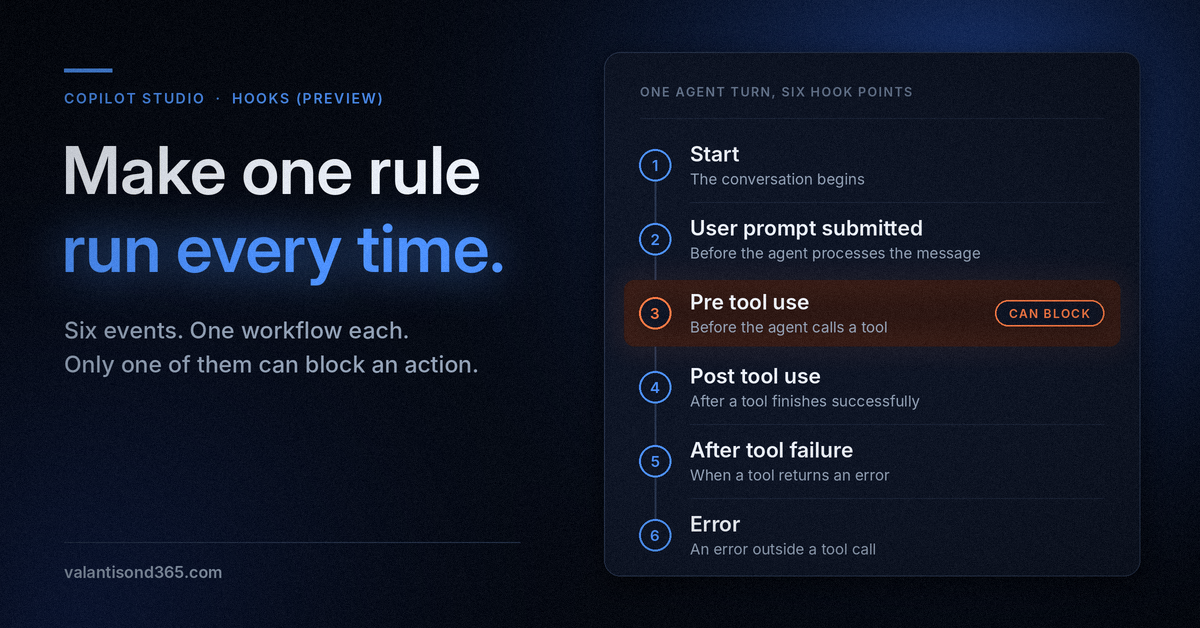
You write “Always check the customer’s region before you create an order” into the agent instructions. The agent follows it. Most of the time. Then one day it doesn’t, and nobody can tell you why.
That’s the gap hooks close. A hook doesn’t ask the agent to remember anything. It runs a workflow every time a specific event happens, whether the agent thinks it’s relevant or not.
You’ll learn:
- What a hook is and how it differs from a tool
- The six hook events, what each one sends and what it can return
- How to add a hook and build its workflow without breaking the event match
- The limits that matter before you put a business rule behind a hook
TL;DR
- What it is: A hook runs one of your workflows automatically when something happens in your agent, such as a session starting, a tool running, or an error occurring. Today the action is always a workflow.
- Where: Agents powered by the Microsoft Copilot harness in Copilot Studio (the harness formerly called the GitHub Copilot harness). Preview.
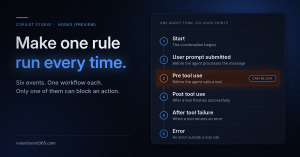
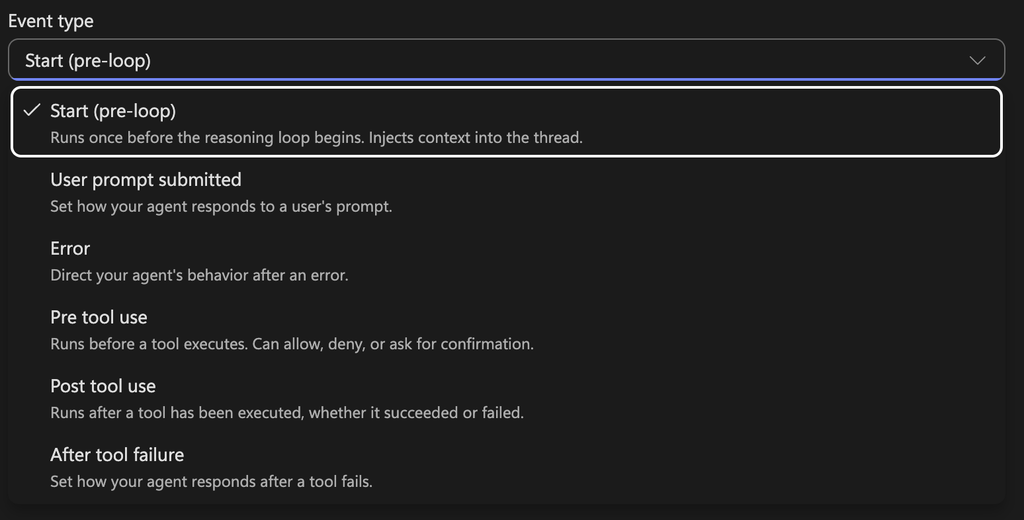
- Six events: Start (pre-loop), User prompt submitted, Error, Pre tool use, Post tool use, After tool failure.
- Only one can block: Pre tool use is the only event that can stop an action. The others add context or change values.
- Gotcha: Hooks fail open. If the workflow fails, times out, or returns something the agent can’t read, the agent continues as if the hook returned nothing.
- Cost: The harness uses usage-based billing with Copilot Credits, and billing starts while you build and test.
Where hooks come from
On the standard harness, topics with system triggers ran logic at fixed points. In the Microsoft Copilot harness, that job moves to hooks. Topics triggered on user intent, and other system triggers such as Message received, are replaced by hooks.
Hooks landed in preview with the September 2026 Copilot Studio update. A workflow defines the logic. A hook decides when that logic runs.
Upgrading a standard agent? The upgrade creates a copy on the Microsoft Copilot harness, and your custom topics can be rebuilt as skills or workflows.
Hook vs tool: the difference that matters
Both run a workflow. The difference is who decides.
| Tool | Hook | |
|---|---|---|
| What starts it | The agent picks it, based on the tool’s name and description | The event fires |
| How reliably it runs | Only when the agent judges it relevant | Every time the event occurs |
| What the response does | Gives the agent information it might use | Changes what the agent does next |
The same workflow can be a tool and a hook at the same time, and you can bind one workflow to more than one hook.
My rule of thumb: if you’d write “always” or “never” in the instructions, it probably belongs in a hook.
The six events
Every event sends three inputs to your workflow: event (for example PreTool), timestamp, and metadata. All outputs are optional. Leave one empty and the agent keeps its default behavior.
| Event | When it runs | Extra inputs | What it can return |
|---|---|---|---|
| Start (pre-loop) | A new conversation begins | None | additionalContext |
| User prompt submitted | Each user message, before the agent processes it | prompt | modifiedPrompt, suppressOutput |
| Error | An error outside a tool call | error, errorContext, recoverable | errorHandling (retry, skip, abort), retryCount, userNotification, suppressOutput |
| Pre tool use | Before the agent calls a tool | toolName, parameters | permissionDecision (deny), permissionDecisionReason, modifiedParameters, additionalContext, suppressOutput |
| Post tool use | After a tool finishes successfully | toolName, parameters, result | modifiedResult, additionalContext, suppressOutput |
| After tool failure | A tool returns an error | toolName, parameters, error | additionalContext |
Two details worth reading twice:
- Pre tool use is the only event that can block. Everything else can add context or change values, but can’t stop the agent.
recoverableon the Error event is advisory only. Your workflow decides, not the flag.
The metadata object
Every hook gets the same metadata object: conversationId, userId, userAadObjectId, userDisplayName, channel (for example msteams), agentId, agentName, and agentSchemaName.
Use userAadObjectId to identify a signed-in user. userId is the ID on the channel, such as the Teams user ID. And any field can be empty. The user fields are empty when the person isn’t signed in, so check for a value before your workflow uses it.
Add a hook (step by step)
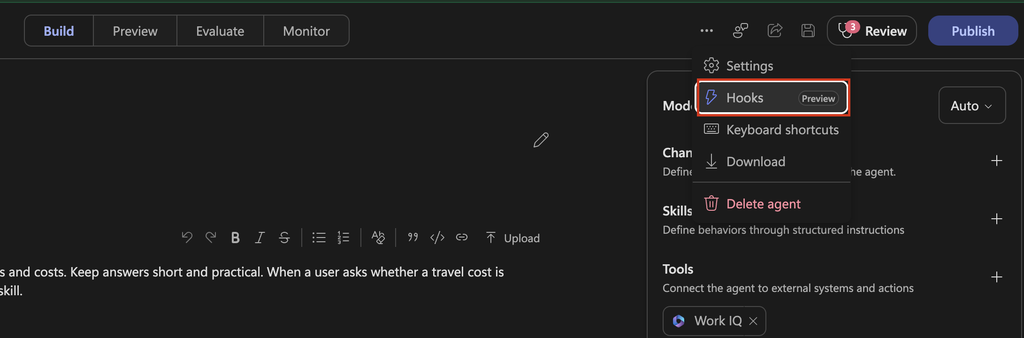
Hooks don’t live on the Build tab. That’s the first thing I’d tell anyone looking for them.
Step 1: Open the Hooks dialog
On the top menu bar, select the three dots (…) > Hooks > Create.
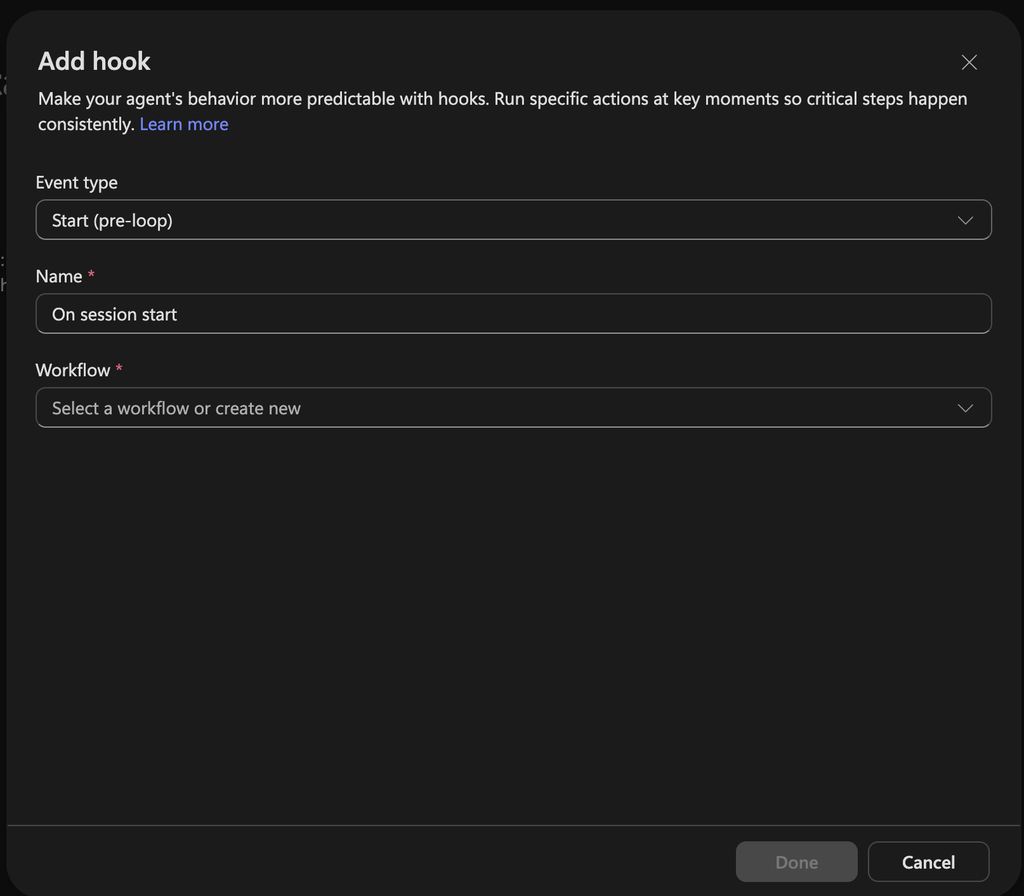
Step 2: Fill in the Add hook page
- Event type: the lifecycle event. Changing it clears the selected workflow, because a workflow built for one event doesn’t fit another.
- Name: required, only for you. Copilot Studio suggests one, such as
Before a tool runs. - Tools: only for the three tool events, and only shown when the agent has tools. Leave it empty for All tools.
- Workflow: the list only shows workflows whose inputs and outputs match the event.
Step 3: Create the workflow from the dialog (if you don’t have one)
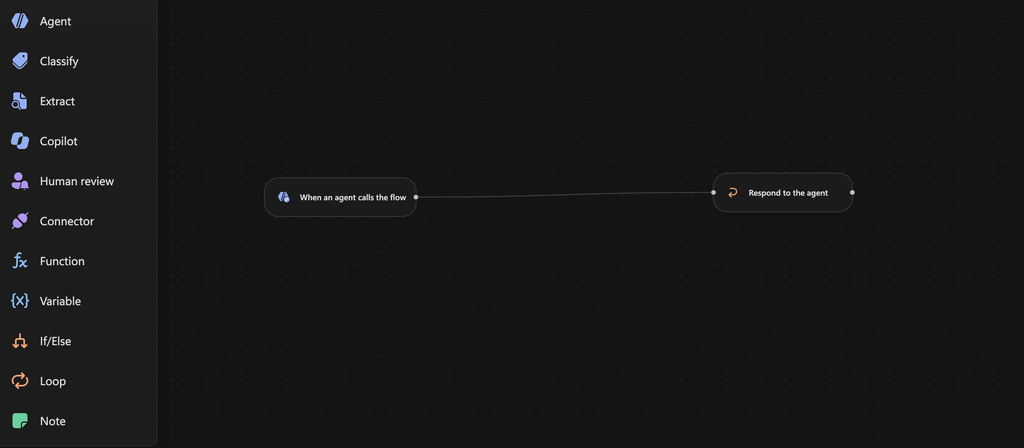
Select New workflow. The designer opens with a starter workflow that already has a When an agent calls the flow node with the event’s inputs and a Respond to the agent node with the event’s outputs. Add your logic in between, then Save and Publish.
Keep the field names from the starter. Copilot Studio uses them to confirm the workflow fits the event. Rename or remove them and the workflow disappears from the Workflow list for that event.
Step 4: Select Done, then save and publish the agent
Done only adds the hook to your draft. It isn’t stored until you save the agent, and it doesn’t run for users until you publish.
A design pattern: one audit hook, one guard hook
Here’s a combination I like: a Post tool use hook scoped to all tools writes an audit record after a successful call, while a second hook scoped to one sensitive tool applies an extra check before that tool runs. Failed calls do not hit Post tool use. To log those too, add an After tool failure hook on all tools.
Here’s a design you could give a try.
- Hook A, Post tool use, All tools. The workflow writes
toolName,parameters,metadata.userAadObjectId,metadata.agentNameandtimestampto a log table. Returns nothing, so the agent keeps the original result. - Hook B, Pre tool use, scoped to one tool (for example, the tool that sends email or updates records). The workflow checks
parametersagainst your rule. If the rule fails, returnpermissionDecision=denyand apermissionDecisionReason. If it passes, return nothing. - Optional Hook C, Post tool use, scoped to the tool that returns customer data. Return a
modifiedResultwith sensitive values removed before the model sees them.
How it actually works
Copilot Studio calls the bound workflow, passes what just happened, and reads the response back into the conversation. Easy to miss:
- Hooks fail open. A failed, timed-out, or unreadable workflow response means the agent carries on as if the hook returned nothing. Don’t rely on a hook as your only safeguard for a business-critical rule.
- The workflow must be published. Saved but not published doesn’t run.
- A hook stores a reference, not a copy. Edit the workflow and you change every hook that uses it.
- Treat inputs as untrusted. Prompts, tool results, and error messages can contain content the agent didn’t produce.
- Validate before you act.
If your hook workflow times out, the agent keeps going as if the hook returned nothing. So I would not rely on a hook to block something critical. Have another control in place if the workflow times out.
Related controls to know about
- A hook is not a person-in-the-loop control. Pre tool use can deny a call automatically, based on your workflow’s rules. It doesn’t pause for a person to approve.
- Activity trace. Use it in the Preview tab to see how the agent processed the turn: which tools, connectors, flows, or skills ran, their inputs and outputs, and any errors. To see what the hook’s workflow did, open that workflow and use its Activity panel.
What it costs
The Microsoft Copilot harness uses usage-based billing. Copilot Credits are charged for LLM tokens, tools (including knowledge and MCP), and the harness itself, and charging starts while you build, preview, and test, not after publish.
Microsoft Copilot harness agents aren’t covered by a Microsoft 365 Copilot license. They’re billed for all usage, including creation and runtime. Workflows are billed in every case except when they run inside a standard harness agent by a licensed user. A hook runs a workflow, so that run is billed too.
What I Learned
Use a hook for “always” and “never”. Instructions are a suggestion to the model. A hook runs every time.
Pre tool use is the only gate. Everything else changes context, prompts, or results.
Fail open means plan for failure. Never let a hook be the only thing between a user and a sensitive action.
Shared workflows are shared risk. One edit changes every hook bound to it.
More from me: Copilot Studio Governance: Admin controls before makers start
Bottom Line
Hooks give the Microsoft Copilot harness back what topics gave the standard harness: logic that runs at a fixed point, every time. Six events, one workflow each, and only Pre tool use can say no.
It’s preview. Use it for context, logging, cleanup, and a second line of defense. Keep the real security controls where they already are.
Your action plan:
- Pick one rule you’ve been writing into instructions as “always” or “never”.
- Build it as a Pre tool use hook scoped to one tool.
- Add a Post tool use audit hook for all tools, plus an After tool failure hook if you also want failed calls in the log.
- Try it in Preview, then save and publish the agent.
Sources
- Hooks (Microsoft Copilot) (preview), Microsoft Learn: https://learn.microsoft.com/en-us/microsoft-copilot-studio/agents-experience/hooks-overview
- About agents powered by the Microsoft Copilot harness, Microsoft Learn: https://learn.microsoft.com/en-us/microsoft-copilot-studio/agents-experience/overview
- Harnesses in Copilot Studio, Microsoft Learn: https://learn.microsoft.com/en-us/microsoft-copilot-studio/harnesses-overview
- Upgrade agents to the Microsoft Copilot harness (preview), Microsoft Learn: https://learn.microsoft.com/en-us/microsoft-copilot-studio/upgrade-to-microsoft-copilot-from-standard-harness
- Add a workflow to your agent as a tool (Microsoft Copilot) (preview), Microsoft Learn: https://learn.microsoft.com/en-us/microsoft-copilot-studio/agents-experience/tools-add-workflow
- Use the activity trace to debug your agent (Microsoft Copilot), Microsoft Learn: https://learn.microsoft.com/en-us/microsoft-copilot-studio/agents-experience/authoring-activity-trace
- Edit and manage your workflow in the designer (Microsoft Copilot), Microsoft Learn: https://learn.microsoft.com/en-us/microsoft-copilot-studio/workflows-experience/flow-designer
- Overview of usage-based billing, Microsoft Learn: https://learn.microsoft.com/en-us/microsoft-copilot-studio/agents-experience/billing-credit-overview
- Manage costs for agents powered by the Microsoft Copilot harness, Microsoft Learn (Power Platform admin): https://learn.microsoft.com/en-us/power-platform/admin/manage-usage-github-copilot-harness
- New and improved: Build apps, extend agents, and transform business processes in Microsoft Copilot Studio (October 7, 2026), Microsoft Copilot Blog: https://www.microsoft.com/en-us/copilot/blog/copilot-studio/new-and-improved-build-apps-extend-agents-and-transform-business-processes-in-microsoft-copilot-studio/
- The GitHub Copilot harness in Copilot Studio is now the Microsoft Copilot harness (October 28, 2026), Microsoft Copilot Blog: https://www.microsoft.com/en-us/copilot/blog/copilot-studio/the-github-copilot-harness-in-copilot-studio-is-now-the-microsoft-copilot-harness/